How NOT To Take Photos
How not to take school photos
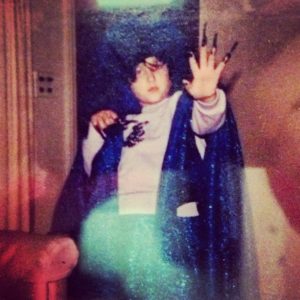
I used to joke with my mom that her old house was a shrine to my youth. Hallways were lined with pictures of me sporting the 1991 bangs reminiscent of Flock of Seagulls (in retrospect, most of us should have “run so far away” from this look). To achieve this not-so-subtle and universally unflattering style, I’d curl three sections of my bangs in alternating directions and then spray them with so much hairspray that my entire “bang” area moved as one unit.

Coinciding with my “big bangs” phase was my desire to have a California sun-kissed look despite living in Illinois. Sun-In Hair Lightener was a classic hair “care” product that promised semi-permanent, sun-bleached color year round. The directions were easy enough for a grade-school student to understand: spray a lot (because more is always better), blast with the hair dryer (because faster is always better), wait for your hair to start breaking off.

Last, there was the “it was in style at the time” look. This look is the reason I will be picking out all of Charlotte’s picture-day outfits until she’s a legal adult.

Despite my mother’s shrine to my bad fashion decisions, I’ve always appreciated having pictures around. Being an only child, I had the luxury of lots of photos being devoted to me alone. That is one reason I have consciously tried to document every step of Charlotte’s childhood. If you’re like me, you want to take the best photos possible. While there is something quaint about those old 1950s photographs of our parents standing up against the station wagon, today there is more pressure than ever to take Pinterest or Instagram quality photographs with every click.
What a difference a year makes
When Charlotte was born, we took the standard-issue hospital photos. Joy and happiness are evident in those phot

ographs. There is a picture of my mother holding Charlotte in front of a hospital window that is one of my favorite photos ever taken of my mother. If I knew then what I know now about composition, I would have gotten in close. Don’t worry about cutting off heads, but leave room for chins. Get in there and fill your frame with those lovely pictures.
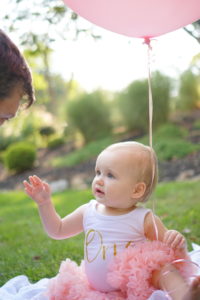
That first year went by so quickly. Before I knew it, we were celebrating Charlotte’s first birthday. With my in-laws in town, I decided it was the perfect time to take some proper family photos. I was a much better photographer than I had been a year earlier. I had learned how to use my camera and had started studying composition rules. The difference was striking. However, I still had some lessons to learn.

How not to take family photos
- Light. You’ll often hear photographers talk about the “gold hour”: the hour after sunrise and the hour before sunset. Light is soft and diffused and the red and amber tones complement all skin tones. Limited by my in-laws’ travel schedule, I had chosen high noon to do our photo shoot. This was no good.

Instead: Go back to that picture of my mother from the hospital. She’s bathed in light from the window, but it’s diffused behind her. That lighting (along for with her unabashed love for Charlotte) is what makes this photograph so great. When we look for that modern, light and airy look, we think that it means “tons of light.” Actually, it means “soft light.” Diffused light coming in from the sides or behind, but not overhead. In Charlotte’s first birthday photos, the light was too harsh. I had seated everyone under the house’s overhang, but it wasn’t enough. With such a sunny day, I would have been better off posing everyone inside next to the window.
2. Communication. I assumed most people fall into a natural pose every time the camera is lifted. I watch my high school students jut their elbows out and twist their shoulders in as an automatic response to seeing a cell phone. I, on the other hand, am a hot mess whenever a camera is turned on. I instantly become stiff and awkward. Add a child to the mix and it’s chaos. Instead of striking a pose, people in the photo will be trying to get the baby’s attention. Well-meaning bystanders will try to help get the baby’s attention and begin reaching their arms into the frame. You end up with a bunch of great photos of the baby, but terrible photographs of everyone else. I’m pretty sure at some point I yelled at my mother-in-law, “Stop doing that and just look at the camera!” Becoming unhinged and yelling at family is definitely not the way to get great family photos.

Instead, lay some ground rules. Before taking a picture with babies and other people, tell everyone that their job is to smile – you’ll be doing the baby wrangling. Ask one designated bystander to help with the attention-getting and be clear with where to stand and where not to stand. If you’re like me, your husband makes a great photographer’s assistant and will learn not to cross your path. Despite your clearest instructions, babies are attention magnets. People will keep going back to them no matter what you say. Just remember this going in. Gently remind people, “Smiles back on me. We’re getting some great shots!”
3. Medium depth of field. I’m the “Trial and “Air” post I talk about f-stops. Opening up the aperture (which, ironically, is a lower f-stop number, usually anywhere from 1.4 – 3.4) to let in light provides a shallow depth of field, giving a narrow range of focus and creating the bokeh effect in the background. Closing the aperture (moving to a high f-stop number) put a lot more things in focus but also made the picture slightly darker. It’s easy to get sucked into that low f-stop and beautiful creamy background. For a long time I was a “one trick pony” – creating great portraits but not much else. However, in Charlotte’s one-year pictures with family, I quickly realized why we need medium depth of field. Take a look at my husband. Go ahead, give him a good, long look: he’s blurry.

I had become so reliant on auto-focus that I had stopped paying attention to whether people were in focus. The issue wasn’t that the auto-focus didn’t work; Charlotte is nice and crisp. The problem was that I had my f-stop set as low as possible, 1.8. If I was being kind, I’d say my husband was “bokehed.” However, he was supposed to be one of the subjects of the picture, not blurred into the background. I had fallen into the seductive trap of always setting my f-stop as low as possible to get that nice, creamy background. Now I needed to learn to control it and use it judiciously.
Instead: A good rule of thumb is to add 1 stop for every row of people you have in the photo. Since everyone is standing so close, and Charlotte is on my mother-in-law’s lap, I’m not sure I had to increase 4 full stops. A 3.8 would have gotten Jason in focus and still given me a soft background. Play around with it. The next time you have family over, don’t be afraid to have the kids sit on grandma’s and grandpa’s laps on the sofa while somebody else stands behind them! When the kids are running around outside, adjust the aperture to get everyone in focus but still provide some nice depth of field in the background. Just start to adjust that aperture. Explore the middle grounds now and find your comfort zone in adjusting the f-stop.
Go out there and take some family photos, because it goes by in a flash!