DSL…ARG! Mirrorless and DSLR Basics
DSL…ARG!
DSLR (and now mirrorless) cameras can be overwhelming at first. For years, I was happy with my light and portable point-and-shoot camera. DSLR cameras, on the other hand, were heavy and bulky. For me, the mirrorless camera has been a great solution. By removing the mirror from the camera, you reduce the size and weight of the overall camera substantially. However, all of the technical settings remain the same. To even take a photo, you have to adjust multiple different settings. If something changes (you walk into a different room, the sun goes behind a cloud) you may have to change one or more settings! Where do you even begin?
In order, adjust the….
White Balance
The first thing you want to adjust is the white balance. This controls the “temperature” of the picture. I did not get this at all until my husband and I redid the lightbulbs in our house. To upgrade to smart and energy efficient bulbs, we had to chose among daylight, cool white, or warm white: this is white balance. It’s the same as picking out a grey paint for the living room: do you want a warm grey or cool grey?
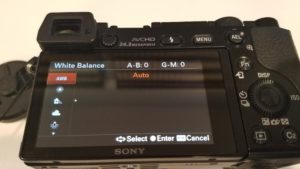
Many DSLR/mirrorless cameras have a variety of preset white balances to choose from. My camera starts out with a daylight option, then shade, cloudy, and a variety of indoor lighting scenarios (warm white, cool white, etc.). I personally have a hard time choosing between warm and cool whites sometimes. A warm white in the wrong situation will make skin look to yellow or orange; a cool white will give a bluish appearance.


ISO

The second setting you should make is ISO. ISO is a relic of old film cameras when you’d buy a 200 or 400 ISO film. Basically, ISO is the sensitivity of the film. 100 is the lowest or most sensitive; 1600 is the least sensitive film. Think of sensitivity as the extent to which “film” reacts to light. In sunlight, you’ll want a very low ISO (100 for direct and sunny, 125 or 160 for clouds or shade), bright indoor light I usually start at 200 up to 800. I rarely go over 400. 800 and up would be suited to night photography. Lower ISOs will make your photo darker, higher ISOs will make it brighter. The caveat is that the higher you put your ISO, the more grain will appear in your photo so you want to keep it as low as possible.
Aperture
I’ve written about Aperture before. I think the priority modes are a great place to start for a true beginner. Regardless or aperture priority mode or in manual, aperture controls the size of the aperture window, like the iris for the camera. Low numbers (1.4 or 1.8) mean the iris is wide open, allowing more light in. This also creates a shallow “depth of field”. Your camera will only be able to focus on one plane, everything else will begin to blur (called bokeh). This is great for beautiful portraits! The higher your number goes, the darker your picture is going to become (because you’re closing the hole that lets light in) and the deeper your field will become (more things will become in focus.
Shutter Speed
I’m still trying to perfect my knowledge of shutter speed. The number you’re given for shutter speed is a fraction of a second. So, 30 would be 1/30th of a second. Unless you’re using a tripod and have docile children, you’ll want to go no lower than 1/100, for shooting sports you’d shoot around 1/500, so work within this range and feel it out. If you’re getting blur of motion, raise your shutter speed. For my daughter, I usually shoot around 1/250 because she’s always in motion. Shutter speed is where you can start to do some cool effects. Upping the shutter speed can stop motion, like I did in the picture with Charlotte whipping pearls around. Lowering the shutter speed can create blur and tell a story about movement.
I said at the beginning that this is the order I set everything. It’s also the order I adjust in, except I start with shutter speed or aperture and work my way up the list. The last thing I every touch is the white balance, unless I made a tragic mistake.

Check your work
Every math teacher I’ve ever had has had the same advice, “check your work”. The same applies to photography. You can look through the viewfinder all your want, but you need to snap a few pictures and go back and review your work. On a recent beach trip, I took what I thought were amazing photos of my daughter and husband in the sand in perfect lighting. However, when I went to review the photos…they were white. Not “light and airy”, the whole frame was white. In the bright light and my beachy excitement, I hadn’t seen that my shutter speed had gotten cranked down to 3. The whole time I was shooting I thought my camera was freezing up. Instead, I was opening the shutter for ⅓ of a second! None of the photos came out and we had to go back and try and recreate putting Charlotte’s toes in the ocean for the first time. The lesson? Don’t get so caught up in the moment you forget to check your work and adjust where necessary.